Search this blog

Showing posts with label Altered Media. Show all posts

21 August 2018

Take A Moment to Reflect

This piece is an altered DVD.


The old unwanted disc was covered in patterned paper
from Hot Off The Press.

Adhered over the top of the blue paper
is my own printed tissue collage,
created using images from The Graphics Fairy.

The words are from Indigo Skies Paper Pad
by Kaisercraft.

There is a Paper Doll from Tim Holtz,
together with a word Doo-Dad
& Remnant Rubs.

The bees are coated with Glossy Accents.

There are three altered glitter gems
on the Paper Doll
to act as his buttons.

He is gazing out into the garden,
watching the bees buzzing around,
reflecting on his thoughts.

We all need to take a moment to reflect.

18 July 2018

Rest a While

Time for a quick project.

I used an old dvd as the base for this piece,
with collage images from Shawn Petite.


There is also printed text,
Tim Holtz Tissue Tape &
Glossy Accents.

I used Distress Ink (black soot)
on the edges of the hearts & dvd.

Today, if you are feeling tired & weary,
sit & rest for a while
until you feel strong enough to fly again.

12 July 2018

Artist Trading Coin: Open your Wings

This is my first Artist Trading Coin.


I have been admiring them on Instagram
& as I like working on a small scale,
I thought I would have a play.

Mine has a 2½ inch diameter,
using an MDF round surface from That's Crafty.

My inspiration was my Blue Wings piece made last month,
for which I had used an old DVD
with images from Shawn Petite,
which I had altered slightly.


To the right hand side, you can see the leftover printed paper,
text & numerals.

Here are both pieces together so you can compare the sizes.


The bird image is from The Graphics Fairy,
which I had printed off to use in my Mini Book.

I think I will use the rest of my coins
(as there were 10 in the set from That's Crafty)
to use up leftovers from future projects.

21 June 2018

Blue Wings

There is a beautiful blue sky today,
which inspired me to alter this old dvd,
using altered images from Shawn Petite,
printed text & edged with Distress Ink. 


Hope you are having a beautiful day today. 


Don’t forget to use those beautiful wings of yours & fly.


25 July 2015

Dare to be yourself

I have been working on a few more projects,
using the collage sheets included in my Soul School Brave Boxes
from the Brave Girls Club.

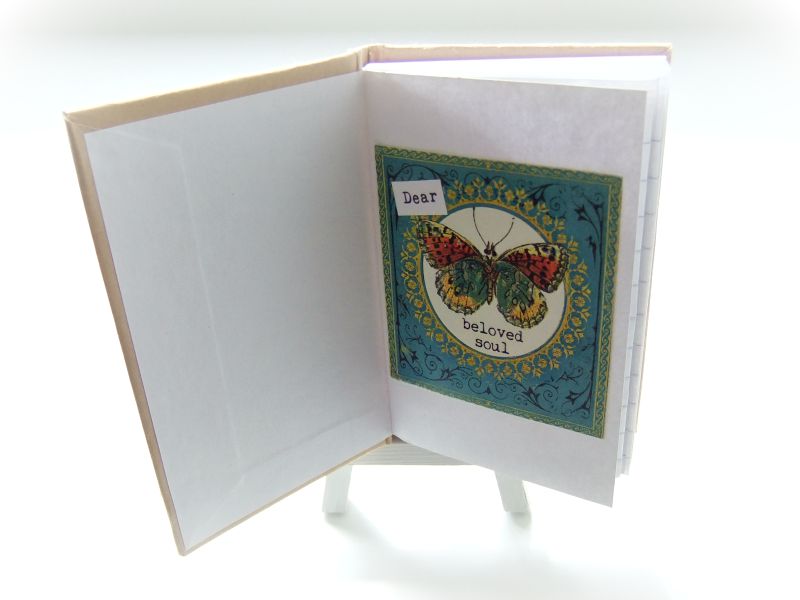
First up is an oh-so-cute little notebook. It measures about 4 by 2¾ inches,
purchased from The Craft Barn.


The front cover has a piece of green corrugate card from Inspire Me Papers,
together with one of the butterfly images from the collage sheets
& a strip of Dovecraft Lace Ribbon (curiosity corner)

On the inside is a welcome message.


I went through the book & pulled out a few pages from the centre of each signature, to thin it out.

Then on each double page spread is a photocopy of each month's Affirmation Card,
with a copy of the wording on the opposite page.


I edged the wording with Whispers Strokes pens, in a matching colour,
whilst the image got my usual sanded edges.

It is small enough to pop into a pocket or a handbag, so that I can keep it with me at all times.

When I have a quiet moment to myself, then I can read the text,
be inspired by the images
& reflect on the lessons learnt.

Next up is something for my desk.

As I was looking through the collage sheets & started to cut each image out,
I was drawn to one of them immediately.

Not surprisingly for me it was a butterfly,
 however what struck me was that it was a rather large circle.

I checked & yes it was exactly the same size as a DVD,
so I began to look through my pile of unwanted media & found this one ...

THEY WHO DARE

Oh yes!

Here is the finished altered media piece.

DARE to be yourself


I printed out the words, punched a hole in the top for the fibres,
so now it can hang by my desk.

I added Ranger Ink Liquid Pearls (White Opal), Gold Stickles,
to add lustre & sparkle ...


& using Glossy Accents,
adhered three dew drops from The Robin's Nest,
to add dimension & shine.


The back is covered in the remaining paper from the box.


I am working on another project, but more on that one next month.

02 August 2012

Green Paper Challenge: Natural Beauty

This project uses the three vintage images given to us by Mary Green
at Green Paper for her monthly collage challenge.


You can see the original images here.


There was some digital tweaking, before the images were printed out
to be used on the media base.

The back, as ever, is as important as the front.

The butterfly was shaped & adhered using Pinflair Gel Glue to add dimension.

The butterfly image can be found at The Vintage Moth.


I used moss & ivory twisted cord by Three Kings Ribbon from Joanna Sheen.


It has been a while since Mary has been able to host a challenge & I thoroughly enjoyed it.

02 March 2011

Green Paper Challenge: Winter Snow

Mary at Green Paper hosts a collage challenge each month,
so here is what I created with the inspirational images provided by Mary for March.


The base is an unwanted dvd. 

After downloading Mary's challenge images,
I started by altering the colour balance so all three images toned together,
then printed them out on white card.

To decoupage the lady, I printed her out four times.


All the cut edges were inked with Distress Ink (peeled paint).
The front was covered with one image, then the different layers built up.


I added two old buttons threaded with light silver metallic thread.


The red stamp is taken from a previous challenge, giving a much needed boost of colour.
I punched two holes in the top
& used a piece of old white satin ribbon to create my hanging loop.


The back is covered with an image from Mary's free download collection.

16 February 2011

Green Paper Challenge: Joyful Wishes

Mary at Green Paper hosts a collage challenge each month,
so here is what I created with the inspirational images provided by Mary for February.


I covered an unwanted dvd with patterned papers from the Life's Journey Pansy collection
by K & Company as they toned with Mary's images.


I printed out the picture of the family on photographic paper.
I distressed it by tearing, folding, sanding, scuffing
& aged it with Distress Ink (antique linen).


I used the wording on the Dove's banner, which reads

"May joy be around you"


I added an old button & threads of hessian.


This is the back of the dvd.


17 November 2010

Winter Snowflakes

My project this week is inspired by the beauty of snowflakes.


I took an old cd, covered it both sides in paper by Two Peas in a Bucket,
then decoupaged a mandala image from Dover into seven separate layers.


I used Silver Stickles, Clear Rock Candy Distress Stickles
& a clear stardust Sakura pen to add icy twinkly highlights
& finished with clear gems.


I punched a hole through the top, using a Crop-a-dile
& threaded through organza ribbon to make a loop,
so it can hang near my craft desk this Winter.


07 November 2010

Remembrance

11 o'clock in the morning on 11th November each year,
we take time to remember those lost in conflict ...

This is an altered cd, to hang on my desk during this week,
leading up to 11/11 & Remembrance Sunday.


The old cd was covered front & back with black paper & the edges sanded.
I made eleven poppy petals torn from red mulberry paper
& inked the edges with Archival Ink (Jet Black).


I stamped the word Remember on the bottom petal, using a phrase stamp by 7 gypsies.


The centre is an old black button, threaded with black cord.

I used the same cord through a hole punched in the top to create the hanging loop.


The knots symbolise that we should never forget ...

03 November 2010

Be Inspired

Inspired by Tam's whimsy style, today I created Paper Daisy.

I altered an old cd into an inspirational hanging decoration for my desk.


I used papers from Two Peas in a Bucket to cover the cd,
& to create the decoupage layers of the girl.

The clouds were cut from an old dictionary,
again taking inspiration from Tam's latest video, Fly Free.


The back of the decoration, left quite plain.

05 October 2010

Autumn Altered cd

The end of the month will be here before I know it,
so in anticipation of it's speedy arrival, here is my project for Halloween.


It's an altered cd using Erica's Pumpkin & Aubergine & a few of their winged friends.


They are just so cute!


The back is also decorated with black & white checked ribbon through the top so it can hang.


07 July 2010

Summer Dreaming

The weather has been so beautiful lately,
that thoughts have turned to summer holidays, to travel, sun, sea & sand,
so this week's project has been to alter an unwanted cd into a summer decoration.


I used papers from the K & Company Travel Vacation collection,
designed by Tim Coffey.

The colours are so soft & fresh, with vintage images.

I sanded the edges to add a little a touch of faded age.


Both front & back were covered & decorated,
so as it spins & turns in the gentle summer breezes,
it looks good from any direction.


I added a couple of stamped images using Non sequitur rubber stamps (postcard & postmark)
with Distress Ink (brushed corduroy).


I covered the coin images with Glossy Accents.


I punched a hole through the top, using a Crop-a-dile
& used string to create my hanging loop.

Then I made a travel tag, using mountboard to add strength.

This was attached to the cd through another hole with more string.


Where will you be going this summer?

Will there be blue skies, sandy beaches,
heavy luggage, foreign coins,
boat trips & trees swaying in warm tropical breezes?


Will you take photographs,
send postcards home to loved ones
or will they be there with you?

Will there be adventures & new experiences?