Search this blog

02 July 2010

Friday Fun

A fun little project experimenting with heat embossing on material.


Ranger posted a short video yesterday of Claudine heat embossing on the sticky side of her canvas product. I thought I would take this idea & have a play using whatever I had to hand.


Calico fabric, sheets of double-sided adhesive, embossing powders (blue & gold), fibres, a Tim Holtz Sizzix alphabet die & Woodware heart paper punch.

I cut a heart shape freehand from an adhesive sheet & applied it to a square of white fabric.


Using the coated protective paper from the adhesive sheet, I punched out letters, using my Sizzix Sidekick die-cutting machine. I placed the die cut letters on the sticky heart, to make my masks.

I sprinkled blue embossing powder over the sticky surface, tapped off any excess & used a dry paint brush to clean away any powder that remained. I peeled off the masks & sprinkled gold embossing powder on the remaining sticky surface, again tapping off any excess powder.


The powder was then heat embossed, resulting in a glossy yet flexible surface.


I trimmed around the heart shape, fraying some of the edges.

I added a heart embellishment, by punching the shape from the adhesive sheet with the paper punch & using the same process as before.


To finish, I punched a hole through the top of the heart with my Crop-a-dile & tied my fibres.


Using the mask method gives an even level surface, but I prefer the result with the second layer of adhesive sheet. I like the raised surface it gives & as a bonus, the embossing itself is cleaner.

Digital Art Collage

I took some time out today to create a digital collage using a wonderful image provided by Art Creations Friday.


I used paper & elements from a Two Peas in a Bucket digital kit, an image from The Graphics Fairy, an image from an old book from The Vintage Moth & a butterfly from Dover.

01 July 2010

Believe ...

This project is prompted by A Year in the Life of an Art Journal, where the current theme is Believe.

The technique to try was to wreck the page by using water. Fortunately for me, my handmade journal pages are made from watercolour card, so I was happy to oblige.


I took my two blank white pages, a craft sheet, four Distress Inks, pine needles, broken china, peeled paint & weathered wood (all blues & greens), a Mini Mister filled with water, a paint brush & a heat gun.


I pressed the ink pads on the craft sheet, then spritz with water, swooshed the papers in the inks, drying each layer with the heat gun until I got the desired effect. I added a little more broken china by flicking it on with a paint brush.


I composed my poem & printed it out on one of the dried pieces of coloured paper. I tore each verse out, thus "wrecking" my journal page & adhered the pieces on the remaining page.


I added glass dewdrops & a heart punched out from the spare paper.


To finish, I sanded the edges of the page to remove the ink, creating a white border.


Postscript
The prompt link no longer works because they deleted the original posting & replaced the technique to try to using squares of tissue paper instead.

30 June 2010

Dimensional Art Canvas

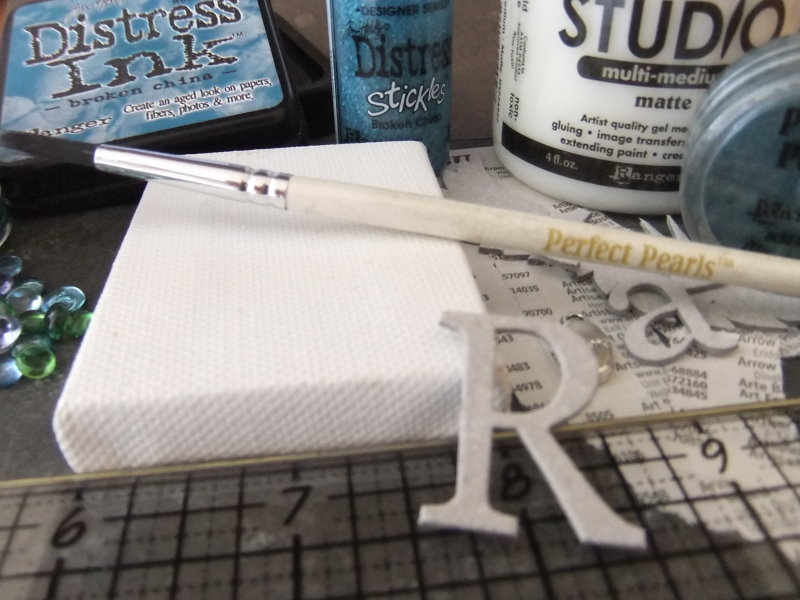
This week's project, inspired by Tim Holtz, was to alter a mini canvas using Grungeboard into a dimensional piece of art.


The canvas is 2 inches wide & 2¾ inches high.


Using the mini Grungeboard die-cut alphabet, I spelt out the word "Art" topping the T with a mini Grungeboard crown element.

To cover the Grungeboard & canvas, I turned to a couple of old telephone books & tore out sections containing the words Create & Art.

Using matte Studio multi-medium, I adhered the paper over the Grungeboard elements & canvas, finishing with a further layer over the top.


Once dried, I highlighted the raised areas with Distress Ink (broken china), Perfect Pearls (Blue Patina) & Distress Stickles (Broken China).

I edged the canvas with Distress Ink (peeled paint).

I used a few green dew drops as jewels on the crown & down one side, for added visual interest & balance.


The silver metal word charm was wrapped around the canvas using metallic blue & light silver thread.


To finish, I took another mini Grungeboard element, this time the wings. I cut the wings in half & coloured them with Distress Ink (peeled paint).

I added words from the telephone directory to write the phrase,

"Let Your Creative Wings Take Flight"

I coated the wings with the matte multi-medium & adhered them to the back of the canvas frame.


28 June 2010

W is for Writing

This is my inchie for letter W of the Inchy by Inch Alphabet challenge.


The image is from Art Creations Friday & the words are torn from an old English Dictionary.


The image was printed on white card & adhered to a mountboard base. The edges were sanded. The dictionary words were inked with Distress Ink (antique linen) & then added to the inchie.

To see a slideshow of this set, please click here.

24 June 2010

Floral Collection

Following the Grid Lock challenge,
I have revisited a previous inchie project
to add it to my altered book art journal.


I used a grid of 5 by 6 across the two page spread,
using negative space to create a feeling
that some inchies had been lost over time,
just as old books sometimes lose pages
due to their age or by frequent reading.

I took my colour lead from the top two inchies,
which have rich gold & yellow, ruby red & purple.

To create the background

The pages were first coated in gesso.
I use clear gesso as I like the effect of the original words
showing through my artwork.

Layers of acrylic paint were then applied to add colour.


To add further interest, I overstamped the dried paint,
using two mini classic rubber stamps by Tim Holtz
& Distress Ink (dusty concord).

Whilst the ink was still wet,
I spritzed the pages with water using a Mini Mister.

This feathered the stamped images
& toned down the colour of the ink.


I took a container with a small amount a water
& added a little of the ink
to create a purple liquid to then splash over the top.


I sprinkled Perfect Pearls powder (Heirloom Gold)
over the wet surface & then dried the pages using a heat gun.


To create the inchies

The inchie collection was made by taking just one leaflet,
which came with the Sunday papers
& cutting out the inch squares & words.


The square cuttings were adhered to white card to add structure,
then the edges were inked with Distress Ink (dusty concord).

A single word was then adhered to each inchie.


To complete the pages, I added four gold coloured metal ornate corners
& ribbon down the centre to act as the page tab.


You can see the original inchie project from 2008 here.


22 June 2010

It's true ... crafting is good for your health!

Quite by chance I discovered Julia Andrus ... last week, the television was on in the background as I went about my daily chores. It was morning so it was tuned to Create & Craft ... then I heard the word "Steampunk".

Quickly I turned the volume up & started to pay attention ... Julia was demonstrating her eco-friendly craft products. With a background in chemistry & prompted by her remarkable recovery from cancer, she was perfectly placed to develop a range of eco-friendly products, including stamps made from recycled plastic, paints that are free from all those nasty ingredients & glue that is so harmless you could actually eat it - although this is certainly not recommended.

The Acrylic Paints, once initially dried, can be buffed with paper towel to draw out the pigment & add a glorious sheen. She demonstrated how to create the distress effect using a resist with Petroleum Jelly. She layered & blended paints to create that rusty old metallic look on die-cut shapes - perfect for steampunk projects. I just wished I had recorded her demonstrations as each show was crammed full of ideas & techniques.

The Green Steam Embellishments are made from recycled paper.

The Green Glue dries completely clear, so perfect for using under her Glass Glintz domed circles, to create a spotlight on your project. Guess what ... the Glintz are made from recycled glass!

The green coloured Stamps are cling mounted, so saving those precious hardwood forests. Made from recycled plastics - how cool it that?

The Board Books have spacers between the pages, so your three dimensional embellishments do not get crushed.

There is more in the Eco Green Crafts range including brushes, air-dried Eco Clay & collage sheets. Hopefully Julia will be back on Create & Craft in the very near future.

I love the company motto

"Where Creativity comes Naturally"

21 June 2010

V is for Vintage

This is my inchie for letter V of the Inchy by Inch Alphabet challenge.


The image is from Art Creations Friday & the words are torn from an old English Dictionary.


The image was printed on white card & adhered to a mountboard base. The edges were sanded. The dictionary words were inked with Distress Ink (antique linen) & then added to the inchie.

To see a slideshow of this set, please click here.

16 June 2010

Tex Tiles

The crusade this month for the GPP Street Team is Grid Lock.


This prompted me to complete an outstanding inchie project.

The inchies were created using a brochure
from Boden of their Spring Collection.

The one inch squares were punched out of the brochure
using a paper punch, then adhered to mountboard bases.


All the edges were sanded.

The lime green tiles were coated with Crackle Accents to add texture.

The red tiles were left plain.


The tiles were glued into my art journal
& an appropriate ribbon & button tab added.


Journalling was added to the final inchie tile,
Journey through Spring,
with details of the challenge hidden inside.


15 June 2010

Fathers Day

A Fathers Day card made using a digikit from Two Peas in a Bucket by Vinnie Pearce called ATC Card Elements.


The design was created digitally using elements from images in the digikit. Once printed out & trimmed, the edges were sanded before mounting on backing paper to match the text colour. Again the edges were sanded, before mounting on the base cardstock.

No ribbon or other embellishment - just an insert sending love on Fathers Day.